The Client Panels window is used to manage Media Outlet Panels and Ad Panels. Using the Media Outlets tab you can design, edit, share and save one or more custom lists of stations, newspapers, TV and Cable/Pay TV outlets in your licensed markets. Ad Panels allow you to create, copy, edit, share and delete three different types of Ad Panels, allowing the user to adjust panels as advertising campaigns adjust to follow market developments. Tracking these changes is key to monitoring activity. Each of the Panel tabs is divided into the Panels created by the logged in user and the shared panels of all the users licensed for the Company. The Media Outlet Panels and the Ad Panels lists are used in reports such as Advertising Expenditure, Song Analysis and Ad Analysis as search criteria.
Accessing this window
Features in this window
Working in this window
![]()
From any window, click the Panels link in the Navigation bar, to access the Client Panels window, similar to this illustration.
Click any area in this image for help
Click any area in this image for help
Edit Media Outlet Panel window
When setting up a Media Outlet panel, you can search by Market, Owner or Format, based on your desired media type. The search can then be narrowed further using the Filter field. Multiple media outlet panels can be saved in your panels list. The Media Outlet panels are used to narrow your search in many of the reports such as Advertising Expenditure, Song Analysis and Ad Analysis by selecting the Panel in the Media Selection field of these reports. Note that the choice you make has an effect on the speed of your search. The greater the search area, the slower the search speed. If you are just interested in a small range of media outlets, define these in a Panel. The Media Outlet Panel tab is divided into two sections. The top section, My Panels, displays the panels created by the logged in user. The bottom section, Shared panels, displays the shared Media Outlet panels created and shared by other users in the same licensed company. The currently selected Panel is highlighted in orange.
Below the Panels list are the following toolbar buttons:
![]() Create a new panel - Use the Create a new panel button to open the Create New Panel Window to enter a new name for the new Media Outlet Panel.
Create a new panel - Use the Create a new panel button to open the Create New Panel Window to enter a new name for the new Media Outlet Panel.
![]() Make a Copy of the selected panel - Use the Make a copy of the selected panel button to make a duplicate copy of the selected Media Outlet Panel. This button will open the Copy Panel window to enter a new name for the Media Outlet Panel.
Make a Copy of the selected panel - Use the Make a copy of the selected panel button to make a duplicate copy of the selected Media Outlet Panel. This button will open the Copy Panel window to enter a new name for the Media Outlet Panel.
![]() Edit the selected panel - Use the Edit selected panel button to open the Edit Media Outlet Panel window. This window lets you add and remove items from the panel, change the name of the panel and share the panel.
Edit the selected panel - Use the Edit selected panel button to open the Edit Media Outlet Panel window. This window lets you add and remove items from the panel, change the name of the panel and share the panel.
![]() View the selected panel - Use the View selected panel button to view the Media Outlets contained in a selected shared panel. Panels that are shared by others in your licensed company are locked and can only be viewed.
View the selected panel - Use the View selected panel button to view the Media Outlets contained in a selected shared panel. Panels that are shared by others in your licensed company are locked and can only be viewed.
![]() Delete the selected panel - Use the Delete the selected panel button to remove the selected Media Outlet panel from the list. Shared panels can not be deleted. The user will be prompted to confirm the deletion of the panel.
Delete the selected panel - Use the Delete the selected panel button to remove the selected Media Outlet panel from the list. Shared panels can not be deleted. The user will be prompted to confirm the deletion of the panel.
![]() Close - Click to the red X or the Close button to close the Client Panels window.
Close - Click to the red X or the Close button to close the Client Panels window.
The Edit Media Outlet Panel window is accessed after naming a new panel or by selecting an existing media outlet panel and clicking the Edit the selected panel ![]() button. This window is divided into two panes the left Search pane and search filters are used to search for specific Markets, Owners and Formats for the selected Media types within the Media Monitors database. The right Edit View pane shows the selected items in the media outlet panel. The arrows in the middle of this window are used to add and remove items from the panel.
button. This window is divided into two panes the left Search pane and search filters are used to search for specific Markets, Owners and Formats for the selected Media types within the Media Monitors database. The right Edit View pane shows the selected items in the media outlet panel. The arrows in the middle of this window are used to add and remove items from the panel.
Click any area in this image for help
Click any area in this image for help
The Media Outlet search filters are used to select the Media Type and then narrow those selected media types by Market, Owner and Format. The Filter field at the top of the Search pane can be used to narrow the search results further. The filter will narrow the results as you type to shorten the search time. Clicking each of the results in the Search results window will highlight the item, the item can then be added to the panel or you can click the item again to deselect it.
The Ad Panels tab in the Client Panels window is used to manage the Ad Panels that are selected in the Advertising Expenditure, Share Report and Ad Analysis windows. The features in this tab are the same as those seen in the Ad Panel window except that this window is only used for managing ad panels not selecting them for analysis. This window allows you to create, copy, edit and delete three different types of Ad Panels, allowing you to adjust panels as advertising campaigns adjust to follow market developments. Tracking these changes is key to monitoring activity.
The three different panel types are:
The Ad Panels tab lists all the existing defined Panels. Panels are listed in numerical and then in alphabetical order. From the Edit Panel window, you can search the Media Monitors database for Accounts, Parents and/or Categories to add to an Ad Panel. The Ad Panels tab is divided into two sections. The top section, My Panels, displays the panels created by the logged in user. The bottom section, Shared panels, displays the shared Ad Panels created and shared by other users in the same licensed company. The currently selected Ad Panel is highlighted in orange.
Click any area in this image for help
Click any area in this image for help
Below the Panels list are the following toolbar buttons:
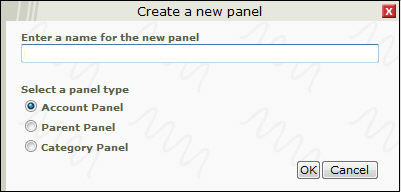
![]() Create a new panel - The Create a new panel button is used to open the Create a new panel window, this allows the user to enter a new name and select a panel type for the new Ad Panel.
Create a new panel - The Create a new panel button is used to open the Create a new panel window, this allows the user to enter a new name and select a panel type for the new Ad Panel.
![]() Make a Copy of the selected panel - Use the Make a copy of the selected panel button to make a duplicate copy of the selected Ad Panel. This button will open the Copy Panel window to enter a new name for the Ad Panel.
Make a Copy of the selected panel - Use the Make a copy of the selected panel button to make a duplicate copy of the selected Ad Panel. This button will open the Copy Panel window to enter a new name for the Ad Panel.
![]() Edit the selected panel - Use the Edit selected panel button to open the Edit Panel window. This window lets you add and remove items from the panel, change the name of the panel and share the panel.
Edit the selected panel - Use the Edit selected panel button to open the Edit Panel window. This window lets you add and remove items from the panel, change the name of the panel and share the panel.
![]() View the selected panel - Use the View selected panel button the view the Accounts, Parents and/or Categories contained in a selected shared panel. Panels that are shared by others in your licensed company are locked and can only be viewed.
View the selected panel - Use the View selected panel button the view the Accounts, Parents and/or Categories contained in a selected shared panel. Panels that are shared by others in your licensed company are locked and can only be viewed.
![]() Delete the selected panel - Use the Delete the selected panel button to remove the selected Ad Panel from the list. Shared panels can not be deleted. The user will be prompted to confirm the deletion of the panel.
Delete the selected panel - Use the Delete the selected panel button to remove the selected Ad Panel from the list. Shared panels can not be deleted. The user will be prompted to confirm the deletion of the panel.
![]() Close - Click to the red X or the Close button to close the Client Panels window.
Close - Click to the red X or the Close button to close the Client Panels window.
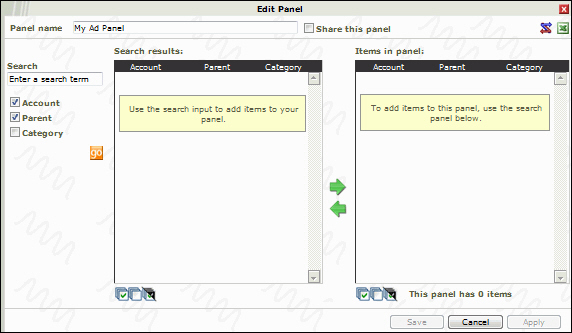
The Edit Ad Panel window is accessed after naming a new panel or by selecting an existing Ad Panel and clicking the Edit the selected panel ![]() button. The Edit Panel window is used to search for Accounts, Parents and/or Categories to add to the panel. This window is divided into two sections the left Search pane and search filters are used to search the Media Monitors database and the right Edit View pane lists the items that have been added to the Ad Panel. The Edit View section is populated when editing an existing panel. If the panel is empty, a contextual tool-tip appears to help the user in adding the first items. Depending on the type of panel created, the layout of this window will be slightly different. The Parent and Category panels will only show one column in the Edit View section. The Search Results section features an additional column to display the number of items that belong to a Parent/Category. These columns can be sorted in ascending or descending order by clicking on the column title. The arrows in the middle of this window are used to add and remove items from the panel.
button. The Edit Panel window is used to search for Accounts, Parents and/or Categories to add to the panel. This window is divided into two sections the left Search pane and search filters are used to search the Media Monitors database and the right Edit View pane lists the items that have been added to the Ad Panel. The Edit View section is populated when editing an existing panel. If the panel is empty, a contextual tool-tip appears to help the user in adding the first items. Depending on the type of panel created, the layout of this window will be slightly different. The Parent and Category panels will only show one column in the Edit View section. The Search Results section features an additional column to display the number of items that belong to a Parent/Category. These columns can be sorted in ascending or descending order by clicking on the column title. The arrows in the middle of this window are used to add and remove items from the panel.
Click any area in this image for help
Click any area in this image for help
The Ad Panel search filters section of the Edit Panel window allows you to narrow or widen your search using the Accounts, Parents and/or Categories type check boxes. Enter a word or phrase, select the desired Ad type then click go. When selecting Category as the Panel type a Show all categories option is available above the Ad type checkboxes. Clicking each of the results in the Search results window will highlight the item, the item can then be added to the panel or you can click the item again to deselect it.
The following editing options are available in the Edit Panel window:
![]() Convert the Panel - This button is only available in the Edit Ad Panel window and is used to Convert the Ad Panel to a different Ad Panel type.
Convert the Panel - This button is only available in the Edit Ad Panel window and is used to Convert the Ad Panel to a different Ad Panel type.
![]() Export to Excel - The Export to Excel button allows the user to Export the Panel to Excel file to be saved or Emailed.
Export to Excel - The Export to Excel button allows the user to Export the Panel to Excel file to be saved or Emailed.
![]() Clear all Select all Buttons - These buttons are used in the Search Results and the Edit View panes to select all Items, deselect all items or invert the selected items in each pane list.
Clear all Select all Buttons - These buttons are used in the Search Results and the Edit View panes to select all Items, deselect all items or invert the selected items in each pane list.
![]() Add selected items to the panel - The right arrow is used to add selected items from the search results pane to the Panel.
Add selected items to the panel - The right arrow is used to add selected items from the search results pane to the Panel.
![]() Remove the selected items from the selection - The left arrow is used to remove selected items from the panel list.
Remove the selected items from the selection - The left arrow is used to remove selected items from the panel list.
Create a New Media Outlet Panel
Copy an existing Panel
Delete a Panel
1. From the Navigation bar select the Panels link
2. Select the Media Outlet Panels tab
3. Click the left-most Create new panel button ![]() below the Media Outlet Panels List.
below the Media Outlet Panels List.
4. Enter a name for the new Panel
5. Click OK.
6. The Edit Media Outlet Panel window will open.
The Edit Media Outlet Panel window is accessed after naming a new panel or by selecting an existing media outlet panel and clicking the Edit the selected panel ![]() button.
button.
1. From the Search Filters on the Left, select the Market, Owner and/or Format from the drop-down menus. Leaving these drop-down options set to All will increase your search time.
2. Select the desired Media Type check boxes to search.
3. Click the go button.
4. To narrow your options further type in a keyword into the Filter field located above the search results.
5. Select the items from the search results window to be added to the panel. One click of the mouse will select the item, a second click will deselect the item. The Selection buttons at the bottom of the search results can also be used to select all Items ![]() , deselect all items
, deselect all items ![]() or invert the selected items
or invert the selected items ![]() .
.
6. Select the add selected items to the panel ![]() arrow button, use the remove
arrow button, use the remove ![]() arrow button to remove the selected items from the panel.
arrow button to remove the selected items from the panel.
7. Click Save to save the panel and close the edit window.

The Edit Panel window is accessed after naming a new panel or by selecting an existing Ad Panel and clicking the Edit the selected panel ![]() button.
button.

Click Save to save the panel and close the edit window.
TIP: This can be a quick way to create a new panel. Copy an existing one, and then edit it and save it as a new panel.
1. From the Panels window
3. Select the Panel to copy.
4. Click the Make a copy of the selected panel ![]() button below the Panels List.
button below the Panels List.
5. Enter a name for the new panel.
6. Click OK.
7. Then Edit the contents of the panel.
1. From the Panels window
2. Select the Panel to delete.
3. Click the Delete Selected Panel ![]() button below the Panel List to permanently delete the current selected panel.
button below the Panel List to permanently delete the current selected panel.
1. From the Panels window
2. Select the Panel to share.
3. Click the Edit the selected panel ![]() button.
button.
4. At the top of the edit window select the Share this panel checkbox.
5. Click Save to save the shared panel.
1. From the Panels Window
2. Select the Panel to rename.
3. Click the Edit the selected panel ![]() button
button
4. Enter a new panel name.
5. Click Save to save and close the edit panel window.
From the Panels window.
Select the Panel to Export to Excel.
Click the Edit selected panel ![]() button
button
Click the Export to Excel ![]() button
button
Enter a File name
Click Save, the file will open in Excel