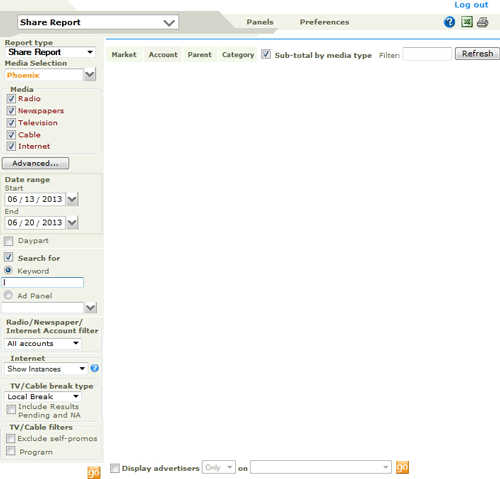
The Share Report gives a breakdown of market share and revenue by account type for a set period for a selected Market or Panel.
Accessing this window
Features in this window
........Results Mode
Working in this window
Select the Share Report option from the Launch Pad window.
Or from any other Media Monitors report window, select the Share Report option from the Pick Report field to access this window. When you open the Share Report window for the first time in a session, the results pane is blank. Click here for an illustration of the Share Report window in Results Mode.
Click on any area in the image for help

Click on any area in the image for help
Media Selection field
......Media Selection pane
Media Checkboxes
Advanced options
Start and End Date
......Month
......Quarter
Daypart checkbox
Search for... checkbox
...... Radio/Newspaper/Internet Account filter
...... Internet
...... TV and Cable filter
Include Results Pending and NA checkbox
Exclude TV/Cable self-promos
Subtotal by Media Type checkbox
Market/Panel, Account , Parent and Category Results tabs
Filter pane field and Refresh button
Results Pane

The Report Type drop-down is used to select the type of Share Report to use, the user can select from the Share Report, Share Comparison or Share Trend. The Share Comparison report compares market share and revenue by account type based on two different date ranges. The Share Trend Report shows the Monthly or Quarterly trend for a specified date range of the market share and revenue by account type for the selected Market or Panel.
![]()
This field allows you to select, and then displays, a media outlet, one of your panels, or a market (where your license covers multiple markets). Media Monitors will search within the selected media outlet, station panel, or media outlets in the market or markets. Media Monitors remembers your selection when you next access this window. To change your selection, select a different option in the Media Selection pane. The choice you make has a large effect on the speed of your search. The wider the search parameters, the more Media Monitors has to search through. If you are only interested in a small range of media outlets, define these in Panels. If you operate in a large market or overlapping markets, selecting all media outlets in the city or cities for your markets will have an impact on search speeds.
When you select a Media Outlet or a Market, the Results Tab and the associated Header will display Market...
![]()
When you select a Media Outlet Panel or shared panel, the Results tab and the associated Header will display a Panel tab instead of the Market tab.

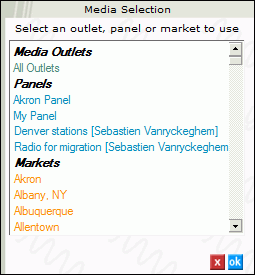
This pane is accessed by clicking the drop-down arrow to the right of the Media Selection field. It displays and allows you to select your default Media Outlet, any of your panels, shared panels, or any of your markets. The current selection is highlighted. The choice you make here can be further refined when the search results are displayed.
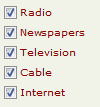
In this pane, you can specify the type of Media to search through by checking the Radio, Internet, Newspapers, TV or Cable checkboxes.
Note: Selecting Newspaper will only return Instance Counts. Revenue and Revenue Share percentages will not be displayed
When searching markets only, this button is activated. Click to display all media outlets in the selected market in the Media Outlet Selection pane.
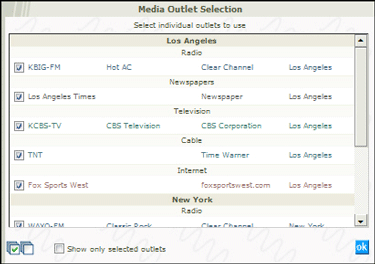
You can then deselect outlets from this list to search within the remaining outlets. At the bottom of the pane are two buttons to select all or un-select all outlets. You can opt to keep un-selected outlets in view as well. Opening this pane closes the Media Selection pane.
In the two date range fields (Start and End Dates) in the left hand panel, you specify a date range to search in. Click the arrow at right in either date field to access a calendar control, which lets you specify a date for either start or end field. A date range in this window is always 24-hours. See also the Date Range fields notes.

The Compare to date range is available when selecting the Share Comparison Report type. The Compare to date range uses the same options found in the Date Range fields topic.
![]()
The Period type field is available when selecting the Share Trends Report type. The Period type is used to select the period by Month or by Quarter to analyze the trend of the market share and revenue by account type for the selected Market or Panel. Depending on the selection made the Date Range options will change.
When selecting Month as the Period Type the Date Range will change to display only the months in the calendar drop-down, allowing the user to select a beginning month and ending month for the Share Trend report.
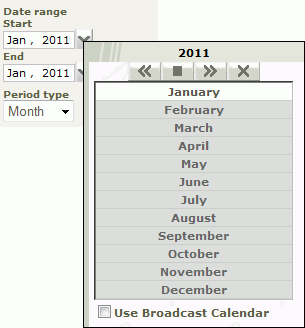
When selecting Quarter as the Period Type the Date Range will change to display only the yearly quarters in the calendar drop-down, allowing the user to select a beginning quarter month and ending quarter for the Share Trend report.
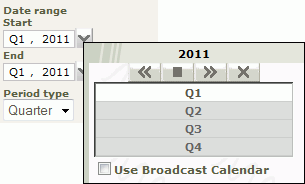
![]()
Check this box to access the Dayparts window to specify a Daypart as part of your search criteria.
![]()
Two options are available from this checkbox. To select an option, click the Checkbox.
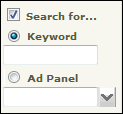
The default option presented when you check the Search For... checkbox is the Keyword option. In this field, you can optionally enter a text string to narrow down the search. If you know the exact text of the item you are searching for, entering text in this field can speed up your search, by avoiding the need to repeatedly drill down with multiple searches. This field can be used to search for an ad or spot title, or a Group name.
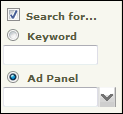
See the notes on Using Ad Panels. Click the Ad Panel radio button to access the optional Ad Panel search filter. You can specify in this pane that the search is confined to a predefined set of Accounts. For details on defining and managing Ad Panels, see the Ad Panels topic.
This works identically in this window as in the Ad Analysis window. See the notes here.
...... Radio/Newspaper/Internet Account filter
...... Internet
...... TV and Cable filter
Depending on the media outlets selected, one of the following filter options are available:
Radio/Newspaper/Internet Account filter

All Accounts: No filter applied. All Accounts are displayed.
Network - This option will show all the results for Network Accounts. Local accounts are filtered out of the results.
Local Accounts: Network Accounts are filtered out, allowing the user to view Local Accounts only.

This Internet filter will allow you to choose between Internet Instances or Internet Observations.
Internet Instances- An Instance is the occurrence of a unique creative on a specific web site and day
Internet Observations - Observations is the total number of times the unique creative was encountered by our data collection process on a specific web site and day. A higher Observation count may indicate that a given creative will be seen more frequently than a creative with a lower Observation count. This is mostly applicable when looking at observations on a single site, as differences in site traffic make comparisons in observations across sites harder to interpret.
The following filtering is available when the Media type selected is TV and/or Cable.
For TV and Cable, a Network Buy is defined as advertising time bought in multiple markets simultaneously in a specific time slot. A Syndicated buy is defined as advertising time bought in multiple markets on Syndicated shows.
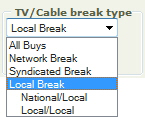
Local users who check the TV or Cable boxes in the Analysis window Search Criteria can filter a search from the following range of Break Types:
All Buys - No filter applied. The Results pane lists every result - all buys, both Network and Local.
Network Break - Only Network buys are displayed.
Syndicated Break - Only Syndicated Breaks are displayed.
Local Break - Only local buys. However, there are two possible types of Local Break:
National Ads, purchased Locally, and Local Ads purchased Locally.
The default setting in this box is unchecked. This control allows you to include or exclude unverified (Results Pending or Not Available) Break Types from a Network/Local search. Check this box to include Results Pending or Not Available Break Types. These will be seen in the Instances window display. When the box is checked, the results will include Airplay where the Break Type (seen when the Client opens the Instances window ) is “Results Pending” and “NA”, in addition to the Break Types they selected (All, Network or Local) in the TV / Cable Filter options field .
Leave the box unchecked, to return those Spots identified as Network and Local; Results Pending and NA will be excluded. Note that a selection in the TV/Cable break type of Network Break will return only Network and a selection of Local Break will return National/Local and Local/Local.
Selecting this option will exclude any spot that the Parent is running that is self promoting.
When Television and/or Cable are selected as the Media Type the Program checkbox is available. Check this box to access the Program Type/Title Selection window to specify a program title or type as part of your search criteria. When the Program option is selected the only Media Type available are Television and Cable, all others are hidden.
![]()
Results are displayed for Market/Panel, Account , Parent or Category by clicking the relevant tab. These are active after a search. The leftmost tab changes from Market to Panel when you select a Panel in the Media Selection field
The Sub-total by media type will give a subtotal in the results for each media type selected. When a Group is expanded in the Market, Account, Parent or Category tab, the results are grouped by media type, and then sorted by outlet in alphabetical order. This option is checked by default.
![]()
This field allows you to filter a Market, Account, Parent or Class search result. For example, to locate a specific Parent:
1. Enter text in the filter field
2. Click the Parent tab.
3. Finally, click the Refresh button to filter for any matching Text string from the current search results.
See also the Viewing Tab Contents notes
Share Report window (results mode)
Share Comparison Report window (results mode)
Share Trend Report window (results mode)
Filtering search results with the Zero-Share Filter Tool
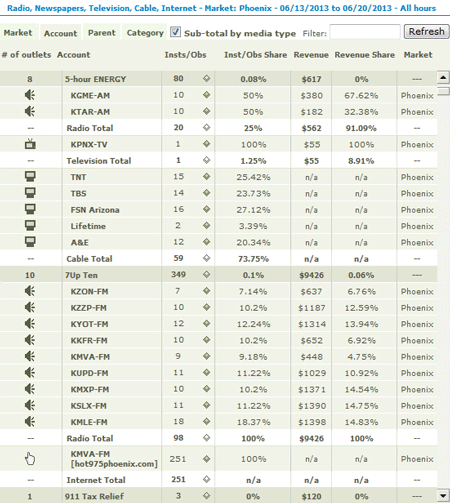
The Share Report results pane displays, for each item in the pane, the total number of outlets in the panel or market, the number of individual instances of spots or ads, the share of instances, the Revenue and Revenue share and a Market field, which carries data when an individual Group is expanded - see the notes for viewing Tab contents. The results in some Tab views can be sorted by header in ascending or descending order. When you first access the results pane after a search, the results are sorted by tab selection in alphabetical order.
Once you have entered your search criteria for the Share Report, Media Monitors returns results in a window similar to this image.
Click on any area in the image for help

Click on any area in the image for help
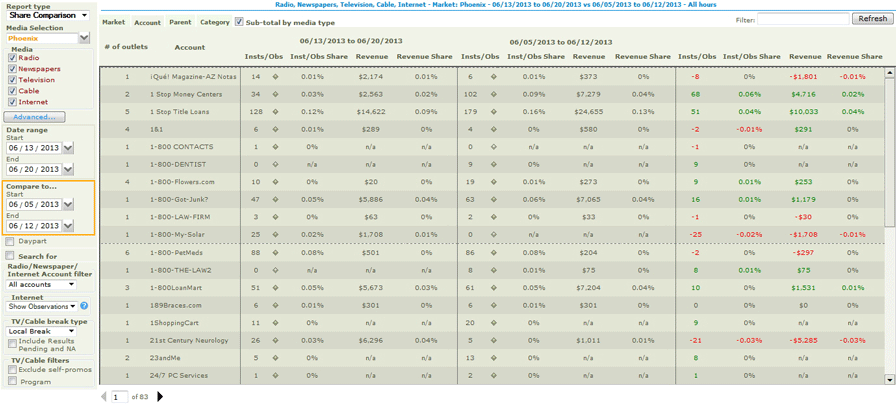
The Share Comparison report results pane displays Share Report results for the date range and the compare to date range with a Comparison section labeled Diff. The Diff section displays the difference between the date ranges with the red values representing a negative difference and the green values representing a positive difference.
Once you have entered your search criteria for the Share Comparison Report, Media Monitors returns results in a window similar to this image.
Click on any area in the image for help
Click on any area in the image for help
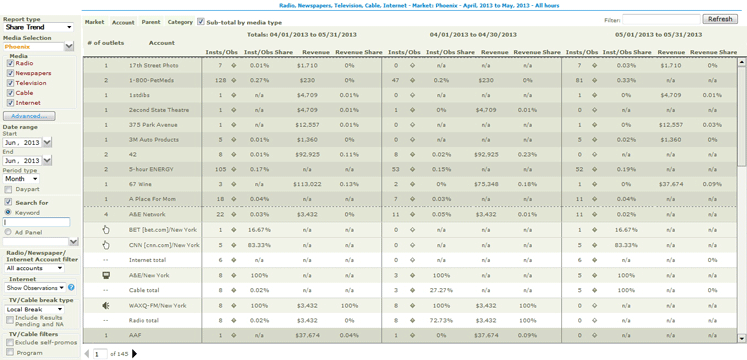
The Share Trend report results pane displays the Share Report results for the entire date range selected, with additional sections for each Period type in the date range.
Once you have entered your search criteria for the Share Trend Report, Media Monitors returns results in a window similar to this image.
Click on any area in the image for help
Click on any area in the image for help
Media Monitors displays a summary of your search criteria and date range above the results pane.
The Instances/Observations results for all tabs has an additional drill down link ![]() that will display the information about each instance for the station and a link to the Instance creative, video or audio for playback. See the Instances Window for more information on this window.
that will display the information about each instance for the station and a link to the Instance creative, video or audio for playback. See the Instances Window for more information on this window.
Once you have generated a Share report, you can drill down further using this filter tool at the bottom of the Account, Parent and Category tabs. Select the Display Advertisers check box, then select Only to only display the results for the selected advertiser or select Not to display the results without the data for the selected advertiser. Use the drop-down to view and select from the available Media Outlet Panels or Media Types specified in the Media Type pane. Select the go button to view the new results.
![]()
Entering Search Criteria
Viewing Results by Tab
Displaying by media subtotals
Sorting results
Optionally check the Sub-Total by Media Type checkbox
Click the Go button.
The Results pane display can be modified at any time after generating a search, by selecting a Tab.
Media Outlet/Panel/Market tab
Account tab
Parent tab
Class tab
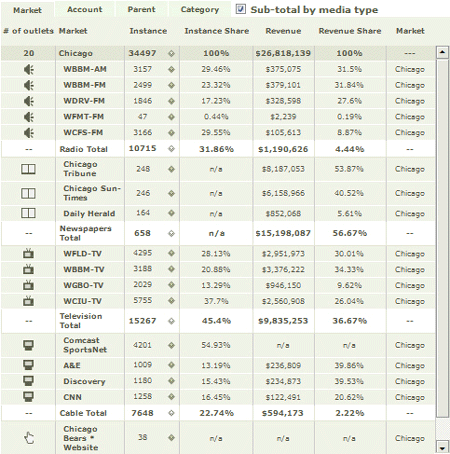
When viewing Markets or Panels in the Media Outlet/Panel/Market Tab, Results are initially sorted by alphabetically by station. The name of the Media Outlet, Panel or Market is displayed in the secondary header under the Panel/Market Header. You can re-sort under any of the secondary headers in this view. You can view additional instance data by clicking the Instance drill down link ![]() .
.
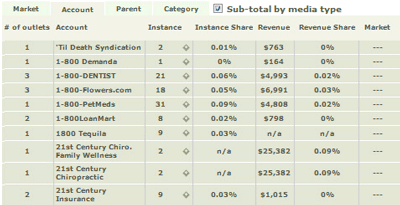
When viewing results by Account, results are sorted by Account initially in Alphanumeric order. Click any individual Account field to expand that entry and view the Media Outlets for the Account. You can sort by clicking on any header, and when you have expanded an entry, you can sub-sort by clicking any field in the entry line. You can view additional instance data by clicking the Instance drill down link ![]() .
.
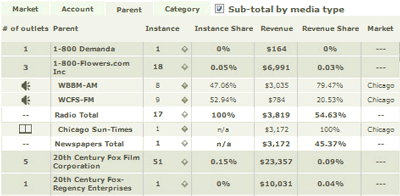
When viewing results by Parent , results are sorted by Parent initially in Alphanumeric order. Click any individual Parent field to expand that entry and view the Media Outlets for the Parent . You can sort by clicking on any header, and when you have expanded an entry, you can sub-sort by clicking any field in the entry line. You can view additional instance data by clicking the Instance drill down link ![]() .
.
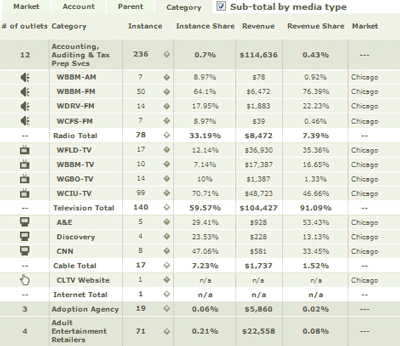
When viewing results by Category, results are sorted by initially in Alphanumeric order. Click any individual Category field to expand that entry and view the Media Outlets for the Category. You can sort by clicking on any header, and when you have expanded a Category, you can sub-sort by clicking any field in the entry line. You can view additional instance data by clicking the Instance drill down link ![]() .
.
In a search where you select more than one Media Type (Radio, Internet, Newspaper, TV and PayTV/Cable, from the Media Checkbox pane, you can sort search results sub-totaled by media type.
Click any header to sort the contents of the search pane by that field. Click again to toggle between ascending or descending order. When you expand an Account, Parent or Category entry to view media outlets, the media outlets are sorted in alphabetical order, unless you have opted to sub-total by media outlet, when they are grouped by Media Type first, and then sorted. Click again on the selected entry to re-sort in reverse alphabetical order.