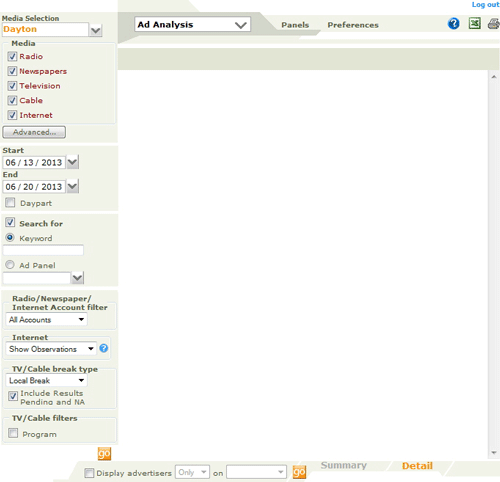
The Ad Analysis window is the start point for Ads or Spot research. In this window, you specify a Date and Time range, select Search Criteria, specify a media outlet, or a panel of media outlets, or market (where licensed for multiple markets), select an Ad Panel, and optionally specify keywords to match in the search. The window opens in Search Mode. Having specified a search, your search results are presented in Results Mode. In Results Mode, your search results can be further broken down and refined in a number of ways, detailed in this topic.
TIP: For notes on specifying a Song Analysis, see the Song Analysis window topic.
Accessing this window
Features in this window
........Search Mode
........Results Mode
Working in this window
See also the AdRev TM analysis window topic for details on this optional feature.
Select the Ad Analysis option from the Launch Pad window.
Or from any other report window, select the Ad Analysis option from the Pick Report field.
Click any area in this detail illustration for help.

Click any area in this detail illustration for help.
Navigation Bar selection field
Search status
Media Selection field
........Media Selection pane
Media Type checkboxes
Advanced button
.......Keyword search
...... Ad Panels
Network and Local Filter options
...... Radio/Newspaper/Internet Account filter
...... Internet
...... TV and Cable filter
Include Results Pending and NA checkbox
Topic Overview: Ad Analysis window
This field displays the selected report and also lets you navigate back to the Launch Pad. For details, see the Navigation topic.
The Status field at the top right of the screen shows what has been selected in the Media Type Checkboxes (Songs, Ads, etc), where this features is regionally available, and the panel or market currently selected, when more than one media outlet is selected.
This field displays your selected default media outlet, one of your panels, or your market (where your license covers multiple markets). This determines the area in which you will search for Spot or Ad plays. To change your selection, pick a different option in the Media Selection pane. Note that the choice you make has an effect on the speed of your search. The greater the search area, the slower the search speed. If you are just interested in a small range of media outlets, define these in Panels, and work with these.
This pane is accessed by clicking the drop-down arrow to the right of the Media Selection field.
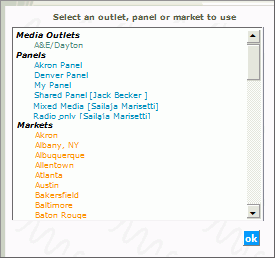
It displays and allows you to select your default Media Outlet, any of your panels, or any of your market(s). The current selection is highlighted in this pane. The choice you make here can be further refined when the search results are displayed.
Topic Overview: Ad Analysis window
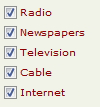
In this pane, you can specify the type of Media to search through by checking the Radio , Newspapers , Television , Cable/Pay TV and Internet checkboxes. Your selection is highlighted in the Status field.
NOTE: When Network-Local subscribers select the Television or Cable options, the TV/Cable filter option is activated; otherwise the Radio/Newspaper/Internet Account filter is displayed. See the notes on Break Filter types in this topic.
![]()
When using a panel or a format, click this button to display all stations in the selected panel, or which follow the selected format in the Filter Outlets pane.
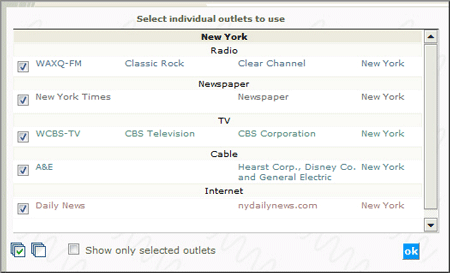
You can then deselect stations from this list and search again within the remaining stations. Opening the Filter pane closes the Media Outlets selection pane. See the notes in this topic on filtering Search Results using the Filter Outlets pane.
Check this box to select or create a Daypart in the Dayparts window as part of your search criteria.
![]()
Two options are available from this checkbox. To select an option, click the box.
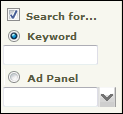
The default option presented when you check the Search For... checkbox is the Keyword option. In this field, you can optionally enter a text string to narrow down the search. If you know the exact text of the item you are searching for, entering text in this field can speed up your search, by avoiding the need to repeatedly drill down with multiple searches. This field can be used to search for a particular product, an ad or spot title, or even an agency or client.
Topic Overview: Ad Analysis window
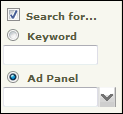
See the notes on Using Ad Panels in the Ad Analysis window.
Click the Ad Panel radio button to access the optional Ad Panel search filter. You can specify in this pane that the search is confined to a predefined set of Accounts . For details on defining and managing Ad Panels, see the Ad Panels topic.
These filter options are used in a number of Ad Analysis windows, including Share Report, New Accounts and Advertising Expenditure.
...... Radio/Newspaper/Internet Account filter
...... Internet
...... TV and Cable filter
Include Results Pending and NA checkbox
The Network-Local service allows clients to filter by Ad buys or Accounts in a Spots/Ads Analysis. In TV and Cable, Ads can be bought on a Network or a Local basis, and Network Ads can also be booked locally. You can generated a detailed breakdown of all these Break Types, allowing the user to view buys by break type, with a more basic Accounts filter for Radio, Newspapers and Internet as well as TV and Cable. Break Type information is displayed for TV and Cable Ads in the Break Type column in the Instances window .
Depending on the media outlets selected, one of the following filter options are available:
Radio/Newspaper/Internet Account filter

All Accounts: No filter applied. All Accounts are displayed.
Network - This option will show all the results for Network Accounts. Local accounts are filtered out of the results.
Local Accounts: Network Accounts are filtered out, allowing the user to view Local Accounts only.

This Internet filter will allow you to choose between Internet Instances or Internet Observations.
Internet Instances- An Instance is the occurrence of a unique creative on a specific web site and day
Internet Observations - Observations is the total number of times the unique creative was encountered by our data collection process on a specific web site and day. A higher Observation count may indicate that a given creative will be seen more frequently than a creative with a lower Observation count. This is mostly applicable when looking at observations on a single site, as differences in site traffic make comparisons in observations across sites harder to interpret.
The following filtering is available when the Media type selected is TV and/or Cable.
For TV and Cable, a Network Buy is defined as advertising time bought in multiple markets simultaneously in a specific time slot. A Syndicated buy is defined as advertising time bought in multiple markets on Syndicated shows.
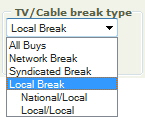
Local users who check the TV or Cable boxes in the Analysis window Search Criteria can filter a search from the following range of Break Types:
All Buys - No filter applied. The Results pane lists every result - all buys, both Network and Local.
Network Break - Only Network buys are displayed.
Syndicated Break - Only Syndicated Breaks are displayed.
Local Break - Only local buys. However, there are two possible types of Local Break:
National Ads, purchased Locally, and Local Ads purchased Locally.
The default setting in this box is unchecked. This control allows you to include or exclude unverified (Results Pending or Not Available) Break Types from a Network/Local search. Check this box to include Results Pending or Not Available Break Types. These will be seen in the Instances window display. When the box is checked, the results will include Airplay where the Break Type (seen when the Client opens the Instances window ) is “Results Pending” and “NA”, in addition to the Break Types they selected (All, Network or Local) in the TV / Cable Filter options field .
Leave the box unchecked, to return those Spots identified as Network and Local; Results Pending and NA will be excluded. Note that a selection in the TV/Cable break type of Network Break will return only Network and a selection of Local Break will return National/Local and Local/Local.
When Television and/or Cable are selected as the Media Type the Program checkbox is available. Check this box to access the Program Type/Title Selection window to specify a program title or type as part of your search criteria. When the Program option is selected the only Media Type available are Television and Cable, all others are hidden.
1. In the Analysis window specify your search criteria.
2a. If working in TV or Cable only, select the options from the TV and Cable Filters.
2b. If working with Radio or Newspapers, select an option from the Radio/Newspaper/Internet Account filter.
2c. If working with Internet, select an option from the Radio/Newspaper/Internet Account filter and the Internet filter
3. Optionally check the Include Results Pending and NA box.
4 Click the go button to the right of the filter options to view just the selected TV/Cable Buys or Accounts.
Click to generate a search. When you first enter the window, or when you specify new search parameters, the button is active, indicated by its Orange color. After a search has been conducted, the button is Gray. There are multiple Go buttons in this window; each will initiate a search.
Topic Overview: Ad Analysis window
Accessing Ad Analysis Results Mode
Ad Analysis Results Mode Features
Working with search results
From the Ad Analysis window in Search Mode, follow the search process steps outlined below to access your Search Results. Your search results are displayed in a window similar to this illustration.
Or use any of the methods outlined described here to drill down into an existing set of search results.
Click any area in this detail illustration for help. Note that not all the features in this illustration are available to all subscribers. Some of the features are only active when the window is in Results mode.
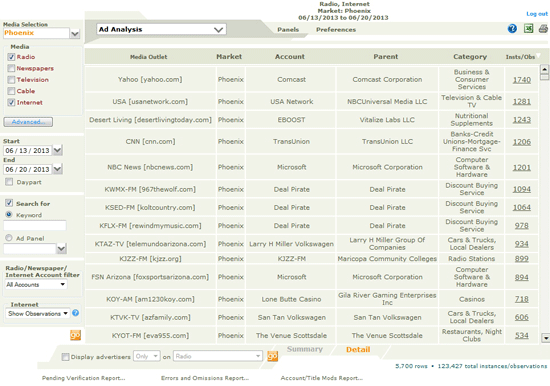
Click any area in this detail illustration for help. Note that not all the features in this illustration are available to all subscribers. Some of the features are only active when the window is in Results mode.
Topic Overview: Ad Analysis window
Instances/Observation column
Demographic column (Radio searches)
Media Selection field ...
,,,,,,,Media Selection pane
Media Type checkboxes
Advanced Button
.......Dayparts window
.......Keyword search
Network and Local Filter options
...... Radio/Newspaper/Internet Account filter
...... Internet
...... TV and Cable filter
Include Results Pending and NA checkbox
Summary and Detail views
Display filter options
Search Count Summary
Go button
TIP: The Results Pane is empty in Search Mode.
Ad Analysis results are displayed in Results Mode in a scrollable browse , which can be sorted by any header: fields displayed are Media Outlet, Market, Account , Parent , Category, and instances (number of plays). Additionally when searching in this window in Radio and Newspapers only, the Demo Number field is displayed. For full details of sorting and other browse features, see the working in Browses topic.
This column displays Instances and/or observations depending on the media type selected. When Internet is chosen as a Media Type and the Internet filter is set to Show Observations this column will show Internet observations of a creative and Instances of an Ad for all other media types. If Show Instances is selected for Internet the results will show the Instances of a unique creative. Clicking on a figure in the instances column for an Internet media outlet will open the Instances window that will show the Observations for the instances found. As with all fields in this window, the browse can be sorted by clicking on the column header. Click any instance number in this column to open the instances window to display the instances for this Ad.
Search results for Radio Media Outlets only also offer a breakdown by Demographic cell.
These fields list the total number of rows returned in the search, and the number of instances in the search.
This feature is common to most Analysis and Report windows. It is particularly useful when working with a large search. The two links at the bottom of the browse allow you to specify a detail view or a summary view.
Click Detail to see every play instance, for each media outlet in the search criteria.
Click Summary to group together instances of plays on all media outlets.
In either case, you can click on the figure in the Instances column to access the Instances window.
At the bottom of the pane, you can optionally select the Pending Verification Report , the Errors and Omissions Report or the Account Title Modifications report. Note that in when you first access the window, you can only access Account Title Modifications report . In results mode, all three reports are available
Topic Overview: Ad Analysis window
1 Follow the on-screen instructions:
2. Specify a date range and optionally a Daypart.
3. Select a Media Outlet: specify a market, Panel or Station to research.
4 Check the Media Outlet checkboxes as appropriate to narrow down the search range.
5. Optionally enter text in the Keyword search or the Ad Panels field to match in the search.
6. Optionally select the filtering options based on the media type selected.
7. Optionally check the Program checkbox to select Program Types and/or Titles from the Program Type/Title Selection window.
8. Click the go button.
9. Your search results are displayed in the results pane.
NOTE: It may take a few moments to display results. A large date range search across multiple media outlets in a large market generates more results that a limited search in a smaller market.
Using Ad Panels in the Ad Analysis window
Selecting a Media Outlet, Panel or Market
Filtering search results with the Filter Outlets pane
Filtering search results with search with the Filter tool
Filtering search results with Network and Local Breaks
1. Follow steps 1- 6 above.
2. Select an Ad Panel
3. Click the go button.
4. You are taken to the analysis results window.
For more information on creating Ad Panels see the Ad Panel Topic
1. Run a search as described here.
2. Click the drop-down arrow to the right of the Media Selection field to open the Media Selection pane.
3. In this pane, select your default media outlet, panel or market to search by.
4. Click OK to close the Media Selection pane.
5. Your new selection is displayed in the Media Selection field and the Status field at the top right of the window.
6. Click the go button.
1. Run a search as described here.
2. Click the Advanced Button to see a list of all media outlets in the current search
3. Select or deselect any of the stations by clicking the checkbox against each media outlet.
4. Click OK to close the filter outlets pane.
5. Click the go button.
The Filter tool is only displayed when more than one media outlet is specified in a search, such as when working with a Panel or a Market.
![]()
Once you have generated a spots or ads analysis, you can drill down further using this filter tool at the bottom of the Ad Analysis window.
1. Check the Display Advertisers box to activate this tool.
2. Select the Only or the Not option in the next field.
3. Then click the drop-down list to view and select from all applicable Media types specified in the Media Type pane, any of your Panel lists, or individual Media Outlets.
4. Scroll to select one of these to use as a filter - you can then include or exclude these accounts from the display.
5. Then click the go button to refresh the display.
Say you want to find advertisers in their market who air on all Media Outlets, other than one specific Media Outlet. To do this
1. Specify and conduct a search
2. In the filter tool, click the dropdown list to view all Media Outlets
3. Select the Media Outlet to filter by from this list.
4. To view the accounts not on the selected Media Outlet, chosen from the filter list, select the Not option.
5. Alternately, to view accounts only on the selected Media Outlet, chosen from the filter list, select the Only option;
6. Then click the go button to refresh the display.

The user can log out at any time from any window by clicking the Log Out link at the top right of the window. Following this link will take you back to the home window, where you can Log in again. Depending on the services you subscribe to, you may have different logins, for different services.