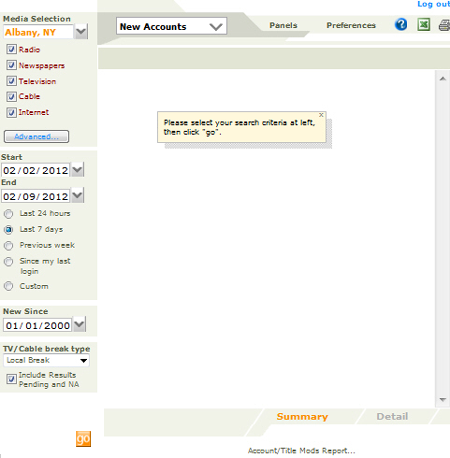
This window allows the user to see all new advertising Accounts for the default media outlet, or any panel or market, which have been added during a specified date and time range.
TIP: This window is an excellent tool to rapidly spot 'new business' on your Panel media outlets or your markets. The size of the search area - the time frame and the size of the market or markets - can affect search speeds.
........Search Mode
........Results Mode
Working in this window
From any Report window, select New Accounts from the Navigation Bar selection field to access this window, or select New Accounts from the Launch Pad.
NOTE: Depending on the terms of your license, you may not see all the options presented in this illustration. For information about any service, contact your local sales office.
Click any area in the image for help.
Click any area in the image for help.
Navigation Bar selection field
This field displays the selected report and also lets you navigate back to the Launch Pad. For details, see the Navigation topic.
The Status field at the top right of the screen shows what has been selected in the Media Type Checkboxes, the panel or market currently selected, the Buy Type and the Date Range used.
........Media Selection pane
Date Range presets radio buttons
Account Filter and TV/Cable Filter Options
This field displays your selected default media outlet, one of your panels, or your market (where your license covers multiple markets). This determines the area in which you will search for Accounts . To change your selection, pick a different option in the Media Selection pane. Note that the choice you make has an effect on the speed of your search. The greater the search area, the slower the search speed.
This pane is accessed by clicking the drop-down arrow to the right of the Media Selection field.
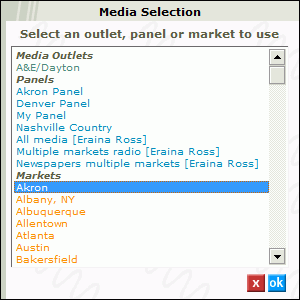
It displays and allows you to select your default Media Outlet, any of your panels, or any of your market(s). The current selection is highlighted in this pane. The choice you make here can be further refined when the search results are displayed.
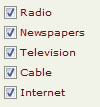
In this pane, you can specify the type of Media to search through by checking the Radio, Internet, Newspapers , Television, Cable/Pay TV and Internet checkboxes. Your selection is highlighted in the Status field.
NOTE: When Network-Local subscribers select the Television or Cable options, the TV/Cable filter option is activated; otherwise the Radio/Newspaper/Internet Account filter is displayed. See the notes on Break Filter types in the Ad Analysis topic.
![]()
When using a panel or a format, click this button to display all stations in the selected panel, or which follow the selected format in the Filter Outlets pane.
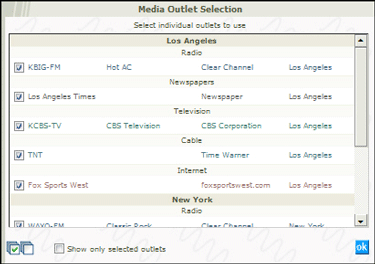
You can then deselect stations from this list and search again within the remaining stations. Opening the Filter pane closes the Media Selection pane. See the notes in this topic on filtering Search Results using the Filter Outlets pane.
In the two date range fields (Start and End Dates) in the left hand panel, you specify a date range to search in. Click the arrow at right in either date field to access a calendar control, which lets you specify a date for the field. A date range in this window is always 24-hours. See also the Date Range fields notes.
NOTE: The default date range is one day - today's date. But you can enter any start date in the past, up to the end date, and of course select a date from the date range preset radio buttons.

TIP: Depending on the time frame, it can take some time to see the results screen. The bigger the time frame, the longer it will take to retrieve data.
Use to specify preset date ranges. The first three automatically fill in dates in the Start and End Dates fields.
Calls for a continuous 24 hour period from the previous day, overlapping midnight and running to today.
Calls for a continuous 7 day period starting a week previously and running to today.
Calls for a continuous period with the Start and End date to match the dates used for the Weekly New Accounts email that a user can opt-in for on the Preferences page
Calls for a continuous period starting from the date and time of the last login, and running to today.
Calls for a continuous period from a selected start date, running to a selected end date, both with a calendar control.
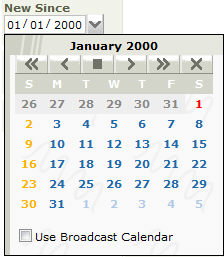
The New Since calendar control allows you to change the start date of when the Market begins monitoring for new accounts. So instead of comparing the week specified in the Date Range field to all the data ever monitored you can choose to set the monitoring date to any date. This will allow you to find all the accounts that advertised in the specified Date Range that have not advertised since the date specified for New Since.
This works identically in this window as in the Ad Analysis window. See the notes here.
Click to generate a search. When you first enter the window, or when you specify new search parameters, the button is active, indicated by its Orange color. After a search has been conducted, the button is Gray.
Summary and Detail tab views
Instances (Number of plays)
Exporting to Excel
Printing
Sorting results
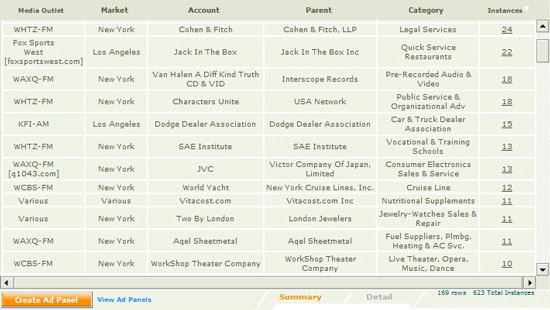
This pane displays the results of your last search. In the browse, the Media Outlet, Market, Account, Parent, Category and the number of instances for each item are shown for the specified time period. At the bottom right, we display a count of rows and instances. Click the Instance value for any item to access the Instances window.
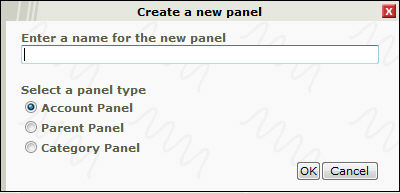
Click this button to create a new panel. The Create a new panel window is used to create one of the three different types of Ad Panels.
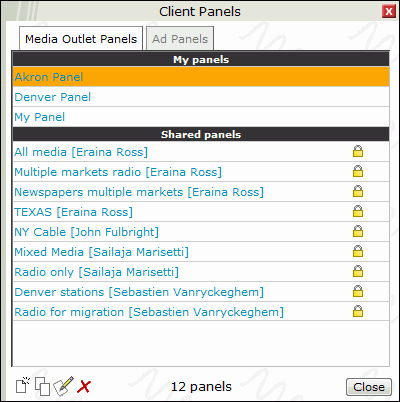
The View Ad Panels link will open the Client Panels window allowing you to Add, Copy, Edit or Delete an Ad Panel or a Media Outlet Panel.
The two links at the bottom of the browse allow you to specify a detail view or a summary view.
Click Detail to see every instance of a spot, for each station in the search criteria.
Click Summary to group together instances of play of spots on multiple stations.
If you change the view from Summary to Detail or visa versa, the change stays in effect for the current session, unless you change back to the initial view.
NOTE: This feature is particularly useful when working with a large (multiple or large market) search.
The number of plays in the search date and time range per media outlet is displayed in the detail view, or for all media outlets in the summary view. As with all fields in this window, the browse can be sorted by clicking on the column header.
TIP: Click the number of plays figure for any entry to open a window displaying the exact start transmission times of plays for this spot or displays for this ad. See the Instances window notes for more details.
1. Specify a time frame in the date range fields, optionally using the date range preset radio buttons.
2. Select your default Media outlet, or a Panel, or all stations in your market, or a specific market, where multiple markets are covered.
3. Click the go button.
4. The search data for the media and time period are displayed in the results pane.
5. Click the Create Ad Panel button to create and Ad Panel from the search results.
6. Click The View Ad Panels link to see all your Ad Panels
1. Run a search as described here.
2. Click the Advanced Button to see a list of all media outlets in the current search
3. Select or deselect any of the stations by clicking the checkbox against each media outlet.
4. Click OK to close the filter outlets pane.
5. Click the go button.
Click on any header to sort the results pane in ascending or descending order. Click again to re-sort in the other direction.